A few hints to get things done more quickly.
Right-click stuff
PMF focuses on ease of use. A very central element is the right-click
popup-menu that opens whenever you right-click a data cell.
The pop-up menu is designed to make finding and editing data in a table
much easier. Use the Filters
to quickly narrow down the search, and use the Edit options to view
and edit data.
It looks like this:

(Some options, for example "Edit XML", are only active when the cell
has the corresponding data type)
Filter:
Enter a search term ("branch" in the example above) and hit ENTER. PMF
will create and run a SELECT statement like "Select * from [table]
where [colname] like [search term]"
This works on numerical as well as
alpha-numerical columns and even on CHAR FOR BIT columns.
To narrow the search further, right-click again on any cell (in the
same or another column) and add another search term with a leading "+"
, this will expand the constraint:
"Select * from [table] where [colname1] like [first search term] and
[colname2] like [second search term]"
The search is case-insensitive.
Other Filters:
- This cell's data: Click this and PMF will select all rows where
the column you right-clicked on has the cell's value
- Add this as constraint: Click this to add another column and cell
value to the select above
- This row: This will create and run a select statement using the
current row's data
- Not NULL: This will select all rows where the given column is NOT
NULL
Distinct: This cell's column:
This will run "select distinct(colName)
from table order by colName"
Display LOB: Behind
the scenes, PMF will write the LOB's content into a temporary file.
Using the file's mime type, PMF will then try to start the system's
default application to display the file.
If for example the LOB is an image file, PMF will try to start your
system's image viewer. For text files, the default editor will be
started and so on.
Whatever you do to the file will not
be written back to the database.
Copy rows and Paste rows:
You can copy rows from one table into another, even across databases.
The target table obviously needs to have the same number and size of
columns (the column names may differ). This will also work with LOBs
and XMLs.
After pasting rows into the target table, the rows are "insert
pending", meaning you have to explicitly click "Save" to commit them.
This is intended for a small number of rows. If you want to move a
large amount of data between tables, you are probably better off with
database specific export and import tools.
Use Tabs to view multiple tables
You can open/view as many tables as you like (in the same database).
Use Menu->New Tab and Menu->Close Tab or STRG+T and STRG+W to
open and close tabs.
A few notes on the GUI
- Back and forward buttons: Use these to go back and forth in the
SQL command history in this tab
- Yelllow field: Name of the current database
- First ComboBox: Table schemata. Select a schema.
- Second ComboBox: Tables in the previously selected schema. Select
a table to view its contents.
- Button "Open": Reloads the currently selected table. Pending changes will be lost!
- Rows to fetch: PMF will cut the result of a SELECT after 2000
rows (default). If you want to display more or less rows, enter a
number here.
- Single Row: This forces PMF to use CURRENT OF CURSOR for UPDATES
and DELETES. Check this, if you have multiple identical rows in your
table (or rethink your table design). "SingleLine" might also be useful
if you have to deal with very large VARCHAR columns. Do NOT use this in
combination with a SELECT that has an ORDER BY clause, because CURRENT
OF CURSOR is not valid in statements containing ORDER BY.
The buttons
- Clone Row: To create a new row, select an existing row and click
'Clone Row' (CTRL+N). The cloned row will be created below the original row.
Click 'Save' (CTRL+S) to commit.
- Save: After editing cells or inserting new rows, click 'Save'
(CTRL+S). No changes will be comitted until you click 'Save'
- Delete: Select rows by clicking on the vertical header. You can
use the usual keys (SHIFT, CTRL or CTR+A) to select multiple rows.
- Run (F5): Executes the command in the field 'SQL Cmd' below.
- SQL Editor: Opens an editor for multi-lined SQL statements, offers text-completion and syntax highlighting.
Field "SQL Cmd"
Enter a SQL statement here (SELECT, INSERT, UPDATE, DELETE but also
commands that are not necessarily table-related: CREATE VIEW, DROP,
....) and click 'Run Cmd' or hit F5 to execute.
These commands will be persistently stored in the ComboBox 'Stored
Cmds'.
Filters
Use these ComboBoxes to create SQL statements
Stored Cmds
Previously executed statements are stored here.
Importing
data
This is available for DB2 only.
To import data from a file into a table, click
"Menu->Table->Import and Load". The following dialog will open:
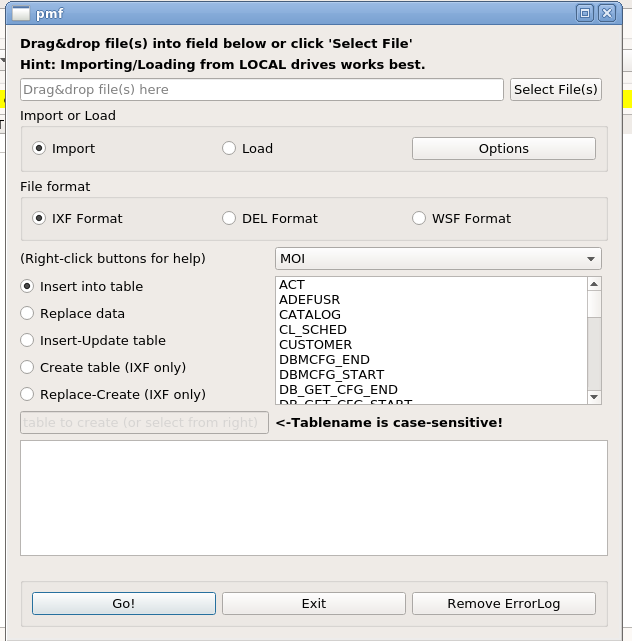
1. Select the file(s) to import either by Drag&Drop or by clicking
"Select File(s)". Note: When
importing multiple files, the filenames must correspond to existing
tables.
When you export a table using PMF, the suggested export filename will
be the tablename (see Exporting
data). When you import such a file, PMF will infer the target table
from the filename.
2. Chose whether to IMPORT or to LOAD data (see "Options" below).
3. Format: PMF will try to guess the correct file format (IXF,
DEL or WSF), you can override this.
4. Select how data should be inserted (Insert, Replace, Create etc),
and
select the target table on the right-hand side. To CREATE a table, fill
in the appropriate field. The
table name is case-sensitive.
Hints for Import and Load:
- To import LOBs (Large Objects) and XMLs, put them in the same
directory as the data (DEL/IXF/WSF) file. PMF willl find and import
LOBs and XMLs automatically.
- Importing and loading data will
work best if the source files are on a local drive. In fact, according
to IBMs documentation, Load will fail when you try to load from a
network share.
- When importing into tables with GENERATED
ALWAYS columns, open the "Options" dialog and select the "All files"
tab to determine how PMF should handle those columns.
- Generally, if Import or Load fails, it is probably a good idea to check out "Options" and modify parameters there.
A note on LOAD: As you
probably know, LOAD is a dangerous beast. Especially in HADR
environments you can completely destroy a table with unsound LOAD
options.
PMF will try its best to assist you, for example, PMF will run "SET
INTEGRITY FOR [target table] ALL IMMEDIATE UNCHECKED" after load and
PMF will allow you to restart counters on GENERATED ALWAYS columns.
Import and Load Options
Click on "Options" for additional settings. To make your settings
permanent, click "Save Settings". You can restore defaults by clicking
"Restore default"
All options are DB2 keywords, please refer to IBMs documentation for
details.
Exporting data
To export data from a table, click "Menu->Table->Export". The
following dialog will open:
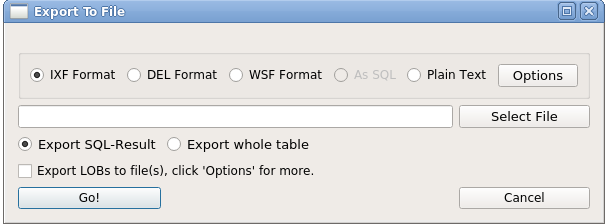
1. Select the export format:
- DB2: selecting IXF will create an IXF file. This format allows
exporting LOBs and XMLs
- DB2: selecting DEL will create a DEL (delimited) file. This
format allows exporting LOBs and XMLs
- DB2: selecting WSF will create a WSF (delimited) file. This
format allows exporting LOBs and XMLs
- DB2: Plain Text will
simply write all data into a formatted text file, LOBs and XMLs will
not be written
- Sql Server: Plain Text will simply write all data into a
formatted text file. This does not support LOBs.
- Sql Server: "As SQL" will create a file containing SQL commands
to import data into a target table. This does not support LOBs.
2. Select the output file by clicking "Select File". By default, PMF
will suggest the name the name of the currently opened table as
filename. The idea behind this is that when you import the file using
PMF, the name of the target table can be inferred from the file name.
PMF will then suggest the correct table as import target (see Importing data)
3. Select what to export:
- Export SQL-Result will export only data currently showing in the
main view (i.e. the result from previous select statements like "Select
col1,
col2 from someTable where col3 is someValue").
- Export whole table will export the whole table
4. On tables that contain LOBs (Large Objects), you can chose to export
those too; click "Options" for more, well, options.
Export Options
Clicking "Options"
will open this dialog (DB2 only):
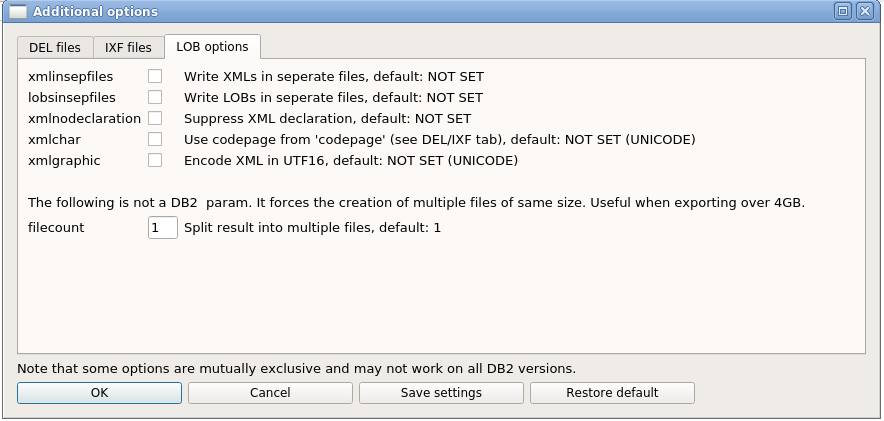
You can set lots of different options for IXF and DEL exports, among
other things you can chose to export LOBs into one large file or create
a file for each LOB.
All options are DB2 keywords, please refer to IBMs documentation for
details.
Click "Save Settings" to make the settings persistent, click "Restore
default" for the default settings.
Password commands in PMF's connection configuration
--Note: This feature will be available in PMF 6.0.06 and later and, at least for now, only for Postgres--
In some environments, you cannot use a static password. Instead, you need to use a one-time password that will expire after some time.
After expiration, you will have to fetch a new password. To some degree, this can be automated in PMF.
The basic idea is to create a command file (or script) that will echo a password. The file's job is to retrieve a password from
an arbitrary source like a keystore, a one-time password via token, an AuthService, an API or some other source.
Ultimately, it needs to echo the retrieved password to stdout, where PMF will pick it up and use it to authenticate.
Set an expiration time (in minutes) in the Field "Timeout" for PMF to autmatically reconnect in the background after n minutes.
Reconnect will only happen when the field "pwdCmd" is set.
To create a new Postgres connection, click "New/Edit" in the Login window, chose "Postgres: Create connection", click "Next"
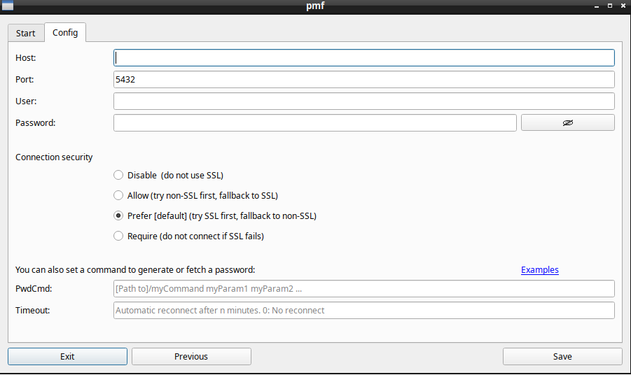
To change an existing connection entry, go to Menu->Settings->Connection profiles->Config and double-click the entry you want to change.
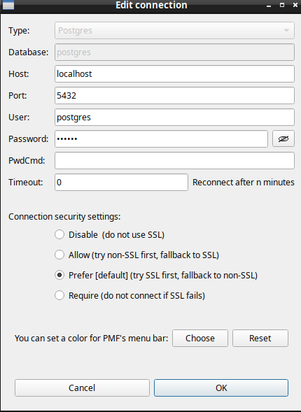
Here you can set or edit password command.
The generalized form for "PwdCmd" (including parameters) is:
[path to]someExecutable param1 param2 ...
where "someExecutable" can be a script (bash, perl, powershell, bat, cmd, ...) or an excutable program.
For Linux, scripts must be set as executable ("chmod +x [NameOfScript]") with adequate user permissions.
Following are a few examples for Windows and Linux.
Windows:
Batch file
Create a simple batch file that will simply echo "mySecretPassword"
@echo off
set PWD=mySecretPassword
echo %PWD%
and save it as mypwd.bat somewhere.
To use it in PMF, set it in "PwdCmd" like this:
[Path to]\mypwd.bat
Powershell
You can also use powershell:
Create a file "mypwd.ps1" and fill it with this content:
@echo off
set PWD=mySecretPassword
echo %PWD%
This will echo "mySecretPassword".
To use it in PMF, set the field "PwdCmd" like this:
pwsh.exe [path]\mypwd.ps1
In this example, pwsh.exe is the executable while the script (mypwd.ps1) is a parameter.
pwsh.exe will execute "mypwd.ps1" which in turn will echo "mySecretPassword" to stdout.
Note that paths containing blanks need to be put in double-quotes:
"[Some Path With Blanks]\someExecutable" "[Path to another file]"
Following is a more elaborate example that will fetch a password from Azure:
If ($null -eq (Get-AzContext)) {
    # User Account
    Connect-AzAccount -WarningAction SilentlyContinue | Out-Null
}

$AzAccessTokenSplat = $null
$AzAccessTokenSplat = @{
    ResourceUrl = "[Resource]"
}

$AzAccessToken = $null
$AzAccessToken = Get-AzAccessToken @AzAccessTokenSplat -Tenant [your tenant-ID]

$AzAccessToken.Token
Linux
Create a bash script called "myPwd" and fill it with these lines:
#!/bin/bash
PWD=""
# Some method to set the variable $PWD...
PWD=mySecretPassword
# ... and echo it to stdout
echo $PWD
This will simply echo "mySecretPassword"
Do not forget to make it executable:
chmod +x myPwd
To use it in PMF, set the field "PwdCmd" like this:
[full path to]/myPwd
Note that paths containing blanks need to be put in double-quotes:
"[Some Path With Blanks]/someExecutable" "[Path to another file]"
The same bash, using a paramater:
#!/bin/bash

PWD=$1
echo $PWD
To use it in PMF, set the field "PwdCmd" like this:
[full path to]/myPwd mySecretPassword
Again, this will simply echo "mySecretPassword" to stdout so PMF can use it to authenticate.